
Cloverfields as of February 2021: Recreating and Installing a Seventeenth-Century Door
/The complex restoration of Cloverfields’ seventeenth-century cellar door requires collaboration across four disciplines: architectural history, blacksmithing, carpentry, and millwork. Architectural historian Willie Graham, blacksmith Peter Ross, carpenter Matt Culp (Lynbrook of Annapolis), and millwork specialist Jack Abeel (Jack Abeel Custom Millworks) combine their expertise to construct an historically accurate, functional door for the Cloverfields cellar.
Forging Wrought-Iron Hardware
The Cloverfields Preservation Foundation contracts Peter Ross of North Carolina for his expertise in early historic blacksmithing. After 25 years’ as master blacksmith for Colonial Williamsburg, Peter founded the company Peter Ross Blacksmith and Whitesmith. He specializes in using tools and methods of the 17-18th Centuries to create English-American wrought-iron pieces. Willie describes Peter as a “master” of early historic work:
Peter was the master blacksmith at Colonial Williamsburg, and I would say 80-90% of the blacksmiths today that are doing historic work in America… were either apprentices to Peter, journeyman, or have taken some kind of training from him. He really is the master at doing this work.
Peter forges three elements of 17th Century hardware for the cellar door -- strap hinges, pintles, and rosehead nails, all wrought-iron -- as well as two ad-hoc tools for the door’s installation.
Strap Hinges
The team models their work from a wrought-iron strap hinge discovered at a late 17th Century archaeological site in Talbot County. With the eye in front, the model hinge closely resembles the contemporary style used in doors today, in which doors are seated into a rabbet or doorstop instead of directly onto the jamb. According to Willie,
The thing that makes this fairly distinctive, for a late 17th century hinge type, is that the eye is on the front of the hinge. You can tell on this hinge that [Ross] intended the eye to be on the front because he has beveled the sides of the hinge to give it a little bit of finish and refinement showing that this is the front of it. In some earlier hinges, the eye was actually on the rear, and that allowed the hinge to sit on the door, and the door would sit just on the face of the door jamb. It didn’t sit into a rabbet or a stop like we do in a modern door today. This was made for a more modern door even though it's of late 17th century origins.
Despite its modern construction, the Talbot County strap hinge matches the style of a 1705 cellar door because, as Willie points out,
The styles of hinges don't change that fast. Something made in the late 17th century would have been perfectly fine for a house built twenty, thirty, forty years later even.
Peter hand-forges the hinges by wrapping the wrought iron around the eye and welding it on the rear. The two pieces of iron meld together in a feathered seam visible to the observant eye. This attention to detail sets the cellar door hinges apart from cruder pieces, where the iron may not be welded at all. Willie comments,
What’s interesting about the hinge is that when Peter made this, he wraps the iron around the eye and forge welds it on the rear. And if you look real carefully, you would see a slight line where he has forged these two pieces together and feathered it. In cruder work, you often see where the eye is wrapped around on the front and welds on the front, or in some cases they’re even wrapped and not welded at all, it's just wrapped around the eye.
Peter adds an element of beauty to the replica hinges, reminiscent of architecture used well into the 18th Century. Willie describes the strap hinges as “distinctive” and detailed:
[The strap hinges] are kind of heavy on the end. They have these big flattened out, rounded-in finials on them. But it has a kind of a nice little step that feathers the material out real fine on the end, like you would see on any kind of strap hinges throughout the 18th century.
Pintles
Peter also forges wrought-iron pintles to carry the strap hinges. Historic pintles were driven into the door jamb with the hinges seated on top. Willie describes the function and design of the restored pintles at Cloverfields:
The hinges get carried obviously on a pintle… the pintle would be driven into the door jamb. The hinge sits on the pintle and would rotate on the pin that sticks up. These are made in the same way as the hinges -- they're made out of wrought-iron, they’ve been hand forged.
Peter splits the pintle ends so they can be clinched after installation. Clinching provides additional durability, according to Willie:
If you look carefully, you would see a seam where Peter took that piece of metal and wrapped it over the eye and forged it together. He then split the ends of it so that Matt could eventually take these things and clinch them after he drove the pintle through the door jamb, he could clinch the ends of them to lock it in tight. Not all pintles clinched like this, but it was one good way to make sure they didn’t pull out.
Ad-Hoc Tools
Peter makes two historic tools specifically for the pintle installation. The first tool -- an iron with a tapered profile similar to the shape of the pintle -- is heated and pushed into the door jamb, leaving a perfectly shaped hole for the pintle installation. The second tool -- a hammer-like device with the same diameter as the pintle’s nestles -- drives the pintle into the jamb once installed, protecting it from damage. According to Willie, these tools make a significant impact on the accurate reconstruction of the door:
This is a real fascinating recreation of how it was done in the period. We are not fooling anybody by using all period tools, but where it makes sense, Matt is using those tools and otherwise he is facilitating a recreation to make it look just like it did when Hemsley had it first done in 1705.
Rose Head Nails
Peter forges rosehead nails for the strap hinges, setting the cellar door apart from other projects at Cloverfields. Wrought iron nails are expensive and difficult to obtain, so mild steel nails are used in most of the restorations. The hand-forged rosehead nails provide an exceptional and authentic accent for the cellar door replica.
Installing the Custom Hardware
With the blacksmithing work complete, carpenter Matt Culp of Lynbrook of Annapolis installs the reconstructed hardware according to Ross’s drawings and design.
Step-Drilling the Door Jamb
First, Matt drills pilot holes in the door jamb where the pintles will be. This ensures the pintles will not skew up or down during installation:
I'm going to go through a few steps here, on how I go about drilling the hole through the jamb with a flat and flush, basically going through level and plumb and square and every way you could think. So that way, when the pintle does get driven through, it doesn't skew one direction or the other, or up or down. Mainly up or down because if it skews up or down, then we can have an issue with the door operating properly (Culp).
Although Peter states the pintle could be installed with one pilot hole burned straight through the jamb, he warns it could lead to sloppy results. Matt therefore takes additional care, using a step drilling process to accommodate the ever-changing size of the pintle:

Carpenter Matt Culp of Lynbrook of annapolis installing the hinges on the cellar doors. 2021 Photo by Pete Albert

Carpenter Matt Culp of Lynbrook of annapolis installing the hinges on the interior cellar doors. 2021 Photo by Pete Albert
Starting out with a ¾ inch forstner bit, then moving down to ⅝ inch forstner bit, ultimately a ½ inch after that, and then finishing it with a ⅜ to a ¼ on the other side. And the reason for doing all that is that the pintle is ever changing in dimension. If I measure out from approximately where it wants to be set and then the thickness of the jamb -- right here where it finishes out is roughly a quarter of an inch thick and still about eleven sixteenth to three quarters an inch this direction, up here seven eighths of an inch and here about three quarters of an inch (Culp).
Matt alternates drill bits to create a gradient effect in the pilot hole. He moves from a ¾ inch forstner bit on the outside (where the thickest part of the pintle rests in the door jamb) to a ¼ inch on the inside (where the arrow-like point of the pintle will push through the doorway). This attention to detail makes it easier to use Peter’s custom iron in the next step.
Using the Ad-Hoc Tools
With the pilot holes ready, Matt burns the door jamb with Peter’s hand-made iron. He heats the iron with a blowtorch and drives it into the pilot holes, profiling the pintle in the flaming wood. Some patina is left after burning, giving the jamb an authentic look.
The bottom pintle seats perfectly, but the upper pintle projects slightly beyond the frame. Matt elongates the upper hole before driving the pintle. Once adjusted, he drives in the pintles, using Peter’s wrought-iron device to protect the nestles from the hammer:
I'm going to start to tap this pintle in. Now, I’m pretty happy with that. This is the main reason why Peter Ross has supplied that driver to us. As you can see how mushroom that is, that would have been all that damage on the end of that pintle, which wouldn't be as attractive.
Peter’s custom tools are in good hands -- Matt’s diligence results in perfectly placed, undamaged pintles with an authentic finish.

A tapered iron spear being heated to use for creating the hole for the door hinge pintels. 2021 Photo by Pete Albert
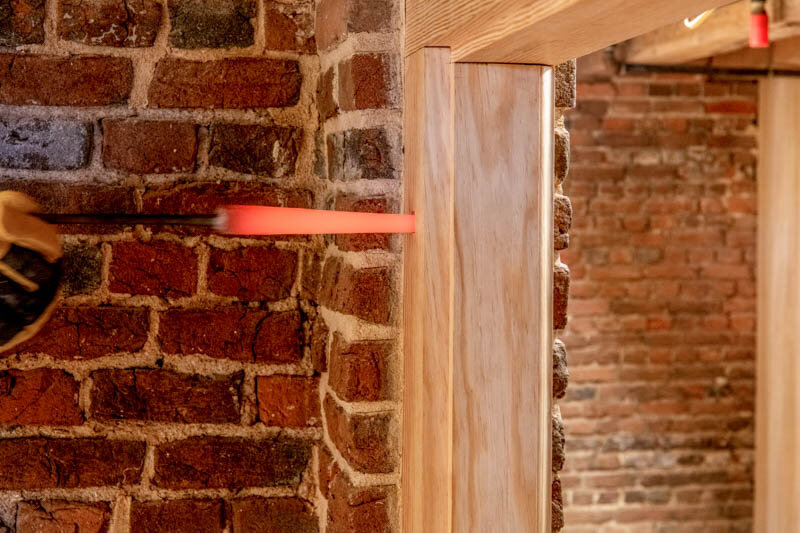
A heated and tapered spear being used to create a hole for the hinge pintel on the interior cellar doors. 2021 Photo by Pete albert

A heated and tapered spear being used to create a hole for the hinge pintel on the interior cellar doors. 2021 Photo by Pete albert

A heated and tapered spear being used to create a hole for the hinge pintel on the interior cellar doors. 2021 Photo by Pete albert

A heated and tapered spear being used to create a hole for the hinge pintel on the interior cellar doors. Photo by Pete albert
Positioning the Strap Hinges
With the pintles in place, Matt moves to the strap hinges. He seats the unattached strap hinges in the pintles and sets the door in the jamb, aligning them in the doorway. He uses temporary screws to secure the hinge before completing the job with rosehead nails:
The door has already been pretty fitted with the proper reveals that we're looking for. I'm going to go ahead and shim this up. And like I said in an earlier shot, we're looking about 3/16’s around the entire door. A little stronger on this than some of our others. Now the lower one has been driven to its proper depth, you can see it’s seating nicely on the thickness of the door. We don't want it to be set back too far -- initially we can always give a little extra drive, but we don't want this thing to be hinged down against the stops. Ultimately, once I get this into position, we're going to move over into the other door, and I'm going to show you what the next process is; but that’s basically drive fitting the hinge, securing it in place with a few temporary screws, and then we’ll pull this thing down and clinch over some rose heads.
With the strap hinges aligned on the door, Matt removes the door from the jamb and lays it flat on a table. Pre-drilling first to protect the wood from splitting, he then secures the strap hinges onto the door with Peter’s wrought-iron rosehead nails. The tips of the nails protrude on the other side, so he rolls them over with a needle nose plier and taps them in position. This clinches the strap hinges in place.

Carpenter matt culp of lynbrook of annapolis fastening the strap hinge to the cellar door. 2021 photo by pete albert

Carpenter matt culp of lynbrook of annapolis fastening the strap hinge to the cellar door. 2021 photo by pete albert
Clinching the Pintles
After installing the pintles and strap hinges, Matt must clinch the pintles into the door jamb. Peter left the ends of the pintles split for this purpose. This complicated process could damage the pintles and door jamb if done improperly. Matt develops a system to carefully navigate the clinching process:
I’ve used this large C-clamp here on the back side of the pintle, and a piece of stainless to prevent that from denting the door jamb where we are at. I don't think that this is really how they would have done it, but for me, this is ensuring that while I'm bending these two tabs over on the back side to clinch this pintle into place, I'm also not driving my pintle back out of the opening by any means. So this is just a preventative measure here to keep this thing seated right where I want it.
Once the clamp is tightened, Matt notes that the surrounding brick jamb may interfere with his work. He resolves this by coaxing the pintle down slowly with different chisels before flattening with a hammer. Alternating between a cold and long chisel, he carefully works the pintle until both ends are the same distance from the jamb. He then hammers the ends of the pintle from both directions until they are flat against the door jamb:
We got a little bit of a brick door jamb here that’s getting in our way, so I basically just have a variety of cold punches that I’m going to get these things started with, and then ultimately I’ll finish it off with just a couple blows of the hammer… I’m going to use this cold chisel here to kind of get me started, and I’ll use my longer chisel on this side to give me some more room to work.... I’ve got them both about the same distance off each other, and I’m going to try and position my clamp up a little bit higher. Now a little bit of both directions [with the hammer].
Matt’s expertise in this complex carpentry work allows the team to proceed without fear of complication or damage.
Choosing the Model: Two Discoveries at Cloverfields
Before the team moves to the final step of the process, architectural historian Willie Graham reflects on two archaeological discoveries which inspired designs for the cellar door.
A Hidden Doorway
The team uncovered a 17th Century doorway embedded in a wall that was erected at Cloverfields in 1912. The moldings were almost pre-classical and did not match the plight moldings seen on the first floor of the house. According to Willie, historic cellar doors and doorways were more conservatively built than those in the rest of the house, often reflecting an earlier style:
We discovered this doorway embedded inside of a wall that was put up in 1912. Doorways to cellars and then the doors in the cellar often reflect an earlier style. You would expect this to be more conservatively built and that indeed is the case with our door frame. So we have these solid jambs that were set into a headpiece. This is a classical molding but done kind of in reverse of what you might expect, almost in a pre-classical way. So something you might expect out of the 17th century, and given that it's 1705 that's no surprise. What is real interesting is that they ran the molding of the jambs up to the head, but they didn't run the molding across the head itself. They didn't miter in the corner and enframe the opening with that molding. And that’s what’s different from the more plight moldings that you see on the first floor of the house. In the case of this door frame, the rabbet to take the door that creates the stop for the door is plained out of the frame itself. This is just one piece of wood for each of the two jambs and then the head’s a separate piece, and the sill being the fourth piece connecting this together. And we have used this then to replicate the style, the moldings, and the way the frame goes together for the cellar door openings.
The conservative, pre-classical construction of the discovered doorway made it an appropriate model for the cellar door opening. The team replicated the hidden doorway’s style, moldings, and fit of the frame for the cellar.
In the Attic
In addition to the doorway, the team discovered a model for the cellar door leaf in the attic at Cloverfields. An original door in the stairhead room provided historic evidence of 17th Century board and back door leaf design. The attic door has different hinges than the replica but is otherwise similar in structure. Matt speaks on the discovery:
[The attic] is where that profile with the board and back door leaf was basically. We determined that this would be a good match. We have that tongue and groove detail in the top, the bead profile matches the in and out of the boards, and then also the way that this batten has been put onto the back side with the relief to allow for the different plains that the door is hung in. Different hinge here, but ultimately, a lot of the evidence for our door leafs downstairs came from this.
Completing the Restoration
Gathering evidence and inspiration from the two models, Cloverfields Preservation Foundation collaborates with Jack Abeel Custom Millwork to construct the replica, a company with 30 years’ experience on historic projects. Supplied with dimensions for the jambs and door leafs, Jack fabricates doors identical to the model, complete with battens and rosehead nails clinched down. Matt states,
With all the information that we’ve gathered from different locations in the house -- on the jambs, on the door leaf -- we’ve been able to supply these dimensions to Jack Abeel Custom Millworks, where he has then supplied us with and fabricated these doors, including the boards and the battens already clinching the nails over. Just as we use the roseheads here, Jack already had these roseheads installed from his shop, so they're really just pairing up really nice. Jack has been great at accommodating the way that we're going to put these together, and we are matching how he has done it as well.
Supplied with Jack’s custom doors, Matt completes the meticulous reconstruction project by checking the cellar door’s functionality. It needs to operate properly in the reconstructed door jamb. He seats the finished product onto the pintles -- a perfect fit. The interdisciplinary collaboration at Cloverfields results in a fully functional 17th Century cellar door, crafted with historical accuracy and architectural precision.
By: Devin S. Kimmel, of Kimmel Studio Architects
For: Cloverfields Preservation Foundation
Video by: Joe Stephens, StratDV Video Production